This post is part 3 of 3 that explains how to install the Image Map extension for SDL Tridion. Please also read the image map extension introduction and details about how to use it.
Note: This will only work on SDL Tridion 2011, that said it would be really easy to get this working on 2009, contact me if you’d like some help with it.
The Image Map tool is built using HTML and Javascript (Not my javascript, the excellent javascript of these guys), it plugs directly into multimedia components as a custom field in the multimedia schema.
There are three simple steps to the installation and it probably takes about 10 minutes in full:
- Download the code
- Install the imagemap code
- Create the schema
Download the code.
Click here to download the code.  The code must sit on the SDL Tridion Content Manager server, so bare that in mind when downloading.
Install the imagemap software
Copy (or move) the \imagemap folder in it’s entirety from the zip file and place it in the on your SDL Tridion Content manager server.
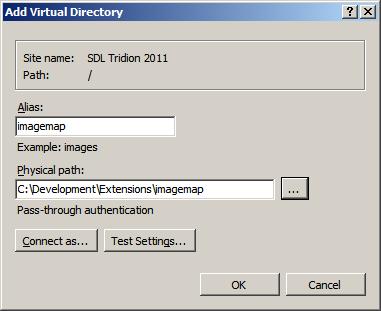
I placed mine in C:\Development\Extensions\imagemap
Open up IIS and browse the SDL Tridion website.  Under the root, create a new virtual directory named ‘imagemap’ ensure the path to the files maps to where you have just placed the image map folder.
If it works you should be able to visit the page http://[TRIDION-SERVER-NAME]/imagemap/index.html and see the image map interface.
Create the image map schema
Create a new multimedia schema called ‘Image map’ and allow the image formats as required.
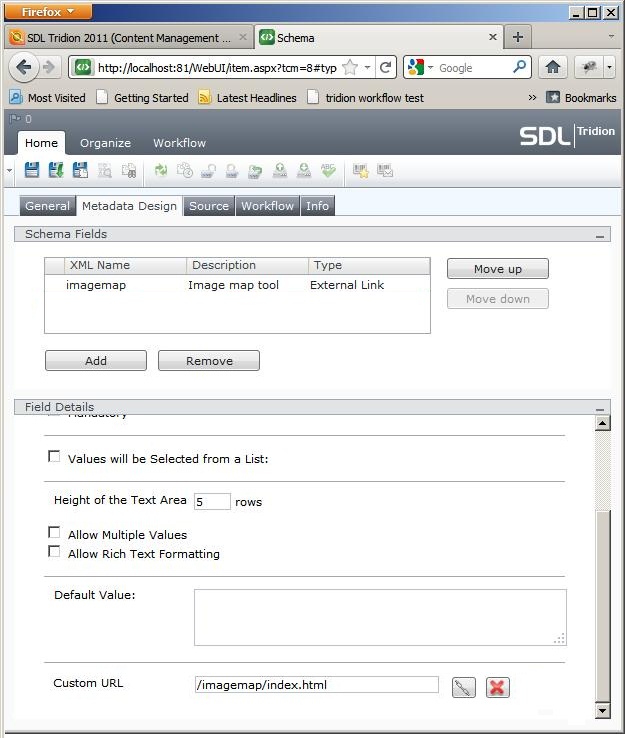
Inside the metadata tab, create the new ‘imagemap’ field as a multi-line text field. However many lines you’d like is fine, but do not check the box to allow rich text formatting.
Note:Â If you wish to create additional metadata fields, make sure the imagemap field is always the first field.
In the custom URL field enter the path to the imagemap tool ‘/imagemap/index.html’ as shown in the image above. Don’t be tempted to not use the ‘index.html’ part of the URL, as the tool may not work correctly.
Now save and close the schema and you’re good to go!
Now it’s installed check out the post containing the usage instructions.


Pingback: How to use the Image Map extension for SDL Tridion | Tridion Developer
Pingback: Image Map extension for SDL Tridion | Tridion Developer
Pingback: SDL Tridion Custom Url Color Picker | SDL Tridion Developer