So I finally got around to having enough time to set up a Java-based DXA connecting to a Content Service in the Amazon cloud.
It was a fun adventure, to say the least, and most of it is due to my rustiness in Java. I have tried with both Eclipse and IntelliJ Idea, and definitely IntelliJ made it a lot simpler by detecting project dependencies and installing them for me – which actually made it harder to get Eclipse to work, as I hadn’t noticed what it had done.
Anyway – below are the steps I followed to get a local instance of DXA running within Eclipse. As with the .NET install, you need to make sure you have a proper firewall configuration allowing communication between your machine and the CIS, as well as having the right mappings set in Topology Manager (I used the default of “localhost:8080″ for this). I will not cover those steps in this post.
Pre-requisites
In order to get this to work, you need to:
- Install a Java SDK
- Install Maven
- Install Eclipse
- Install Tomcat
- Install lombok
Installing Java
Download a standard JDK from Oracle’s website – I went with whatever was the latest version, 64 bit.
Once it’s installed, make sure you set the JAVA_HOME environment variable in your machine, as Maven will need this.
Test that java is installed by running “java -version”
![]()
Installing Maven
Head over to Maven’s download page and download the latest one for windows, unzip it to a location you will remember  and then make sure to add “maven\bin” to your path environment variable.
You can test it by running “mvn -v”
![]()
Installing Eclipse
Oddly enough, this was what took me the longest, as for some reason eclipse.org was super slow today. Eventually, this mirror worked the best for me, but YMMV.
Installing Tomcat
You need an app server to run your application, so we’ll be using Tomcat for this. Head over to Tomcat’s download page and get Tomcat 8.5x (I used 8.5.12). Unzip it somewhere you will remember!
Install Lombok
Don’t ask me what it is, I didn’t bother checking that other than noticing it was needed (thanks to Alexey Zarakovskiy from SDL’s DXA team for pointing me in this direction).
Download lombok.jar from here, and then run java -jar lombok.jar
A simple wizard will ask you to identify where your IDE is, enter the path to eclipse, and click “Install/Update”.

Getting the DXA
Now that we’re done with the prerequisites, let’s get our DXA going.
The first thing we need to do is to download it, and we will use maven to do this for us. Below are the steps I followed, if you know what you’re doing, feel free to improvise – if you don’t know what you’re doing, do exactly as I did.
- Create a folder, for instance c:\dev\java-dxa
- In a command prompt or PS shell, go to this folder and type “mvn archetype:generate” (without the quotes, of course)
- On the next prompt, enter “dxa” (again, no quotes!)
- Enter “1”
- Press Enter to accept the default (latest DXA version)
- Enter “com.sdl.dxa” as groupId
- Enter “dxawebapp” as artifactId
- Press Enter to accept the default version
- Press Enter to accept the default package
- Enter Y to confirm
Now you should have a set of subfolders created under c:\dev\java-dxa, and one of them (dxawebapp) will have a pom.xml, which we will need soon.
Let’s get into Eclipse
Open Eclipse and configure Tomcat as a Server:
- Click File -> New -> Other

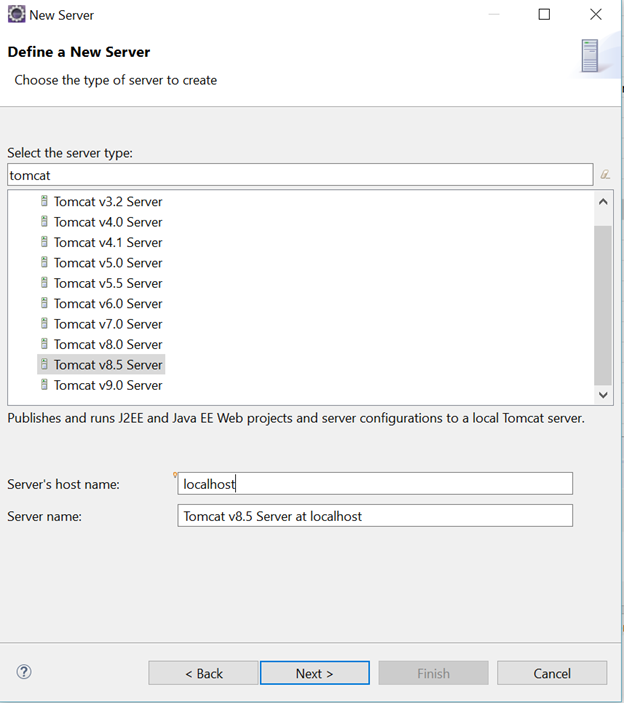
Type “server” to filter and click Next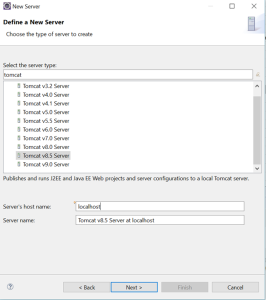
(You may have to expand this window), select Tomcat v8.5 server and click Next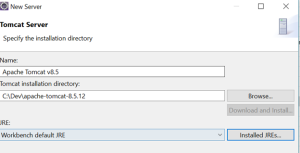
Specify the location where Tomcat is installed then click on “Installed JREs”- Â
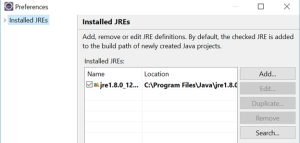
Click on “Add…” 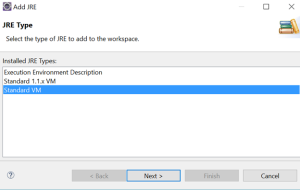
Select “Standard VM” and click Next
Set the path to the folder where the JDK is installed and click Finish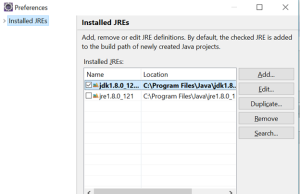
Optionally, set this new JRE as the default.


Quick recap: we now have the DXA’s maven pom.xml, we have Eclipse and we have Tomcat installed as a server in Eclipse. Time to import the DXA into Eclipse:
- Select File -> Import
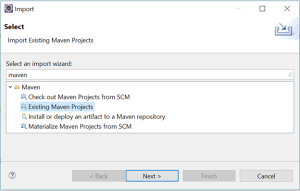
Type maven in the filter window and select “Existing Maven Project”
Browse to the location where you downladed the POM to (c:\dev\Java-DXA\dxawebapp in my case) and click Finish.

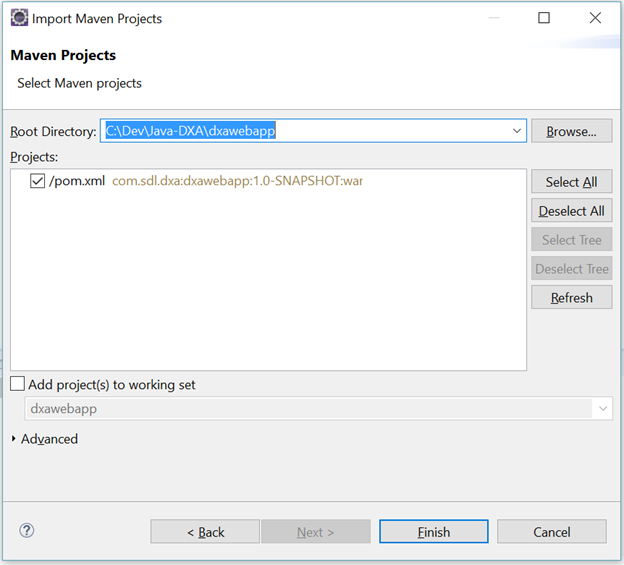
Wait a few minutes for the import to finish. You now should be able to see in your workspace a “DxaWebApp” project. Let’s add the core module to it.
Right-click the dxawebapp project and select Maven -> Select Maven Profiles
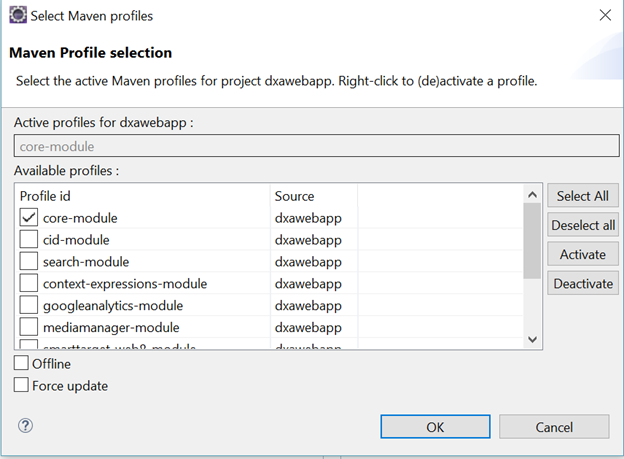
In the window that shows the available profiles, check the box next to “core-module” and click OK.
Next, let’s change the DXA’s context root to be / instead of the default of /dxawebapp. Right click the DXA Web App project again and select Properties (all the way at the end of that menu)

Find the “Web Project Settings” and modify the “Context Root” to /
Last step… you’re almost there!

Edit the cd_client_conf.xml file and enter the URL to your discovery service, as well as the cduser and password to use.
Once that’s done, just right-click the project, select “Run As -> Run On Server”, select the tomcat server that you configured earlier… and wait.
You may see an error on the first attempt, as apparently Eclipse expects Tomcat to be able to launch fully in 45 seconds, and this may not be enough the first time. Just do it again, and you’ll finally see this screen:

Hi Nuno
I am hoping to automate as much as possible so I started looking at compacting the Getting the DXA with Maven part, hoping to be able to batch it.
No luck so far but we can compact the output and interactive steps by passing parameters to Maven.
mvn archetype:generate
-Dfilter=com.sdl.dxa:dxa-webapp-archetype
-DgroupId=com.sdl.dxa
-DartifactId=dxawebapp
-Dpackage=com.sdl.dxa
-Dversion=1.0-SNAPSHOT
Can anyone improve this to pass all parameters so we can run as a batch?
Example output below:
c:\dev\testmaven>mvn archetype:generate -Dfilter=com.sdl.dxa:dxa-webapp-archetype -DgroupId=com.sdl.dxa -DartifactId=dxawebapp -Dpackage=com.sdl.dxa -Dversion=1.0-SNAPSHOT
[INFO] Scanning for projects…
[INFO]
[INFO] ————————————————————————
[INFO] Building Maven Stub Project (No POM) 1
[INFO] ————————————————————————
[INFO]
[INFO] >>> maven-archetype-plugin:3.0.0:generate (default-cli) > generate-sources @ standalone-pom >>>
[INFO]
[INFO] <<< maven-archetype-plugin:3.0.0:generate (default-cli) < generate-sources @ standalone-pom << com.sdl.dxa:dxa-webapp-archetype (Example web application for DXA)
Choose a number or apply filter (format: [groupId:]artifactId, case sensitive contains): : 1
Choose com.sdl.dxa:dxa-webapp-archetype version:
1: 1.3.0
2: 1.4.0
3: 1.4.1
4: 1.5.0
5: 1.6.0
6: 1.7.0
Choose a number: 6: 6
[INFO] Using property: groupId = com.sdl.dxa
[INFO] Using property: artifactId = dxawebapp
[INFO] Using property: version = 1.0-SNAPSHOT
[INFO] Using property: package = com.sdl.dxa
Confirm properties configuration:
groupId: com.sdl.dxa
artifactId: dxawebapp
version: 1.0-SNAPSHOT
package: com.sdl.dxa
Y: : y
[INFO] —————————————————————————-
[INFO] Using following parameters for creating project from Archetype: dxa-webapp-archetype:1.7.0
[INFO] —————————————————————————-
[INFO] Parameter: groupId, Value: com.sdl.dxa
[INFO] Parameter: artifactId, Value: dxawebapp
[INFO] Parameter: version, Value: 1.0-SNAPSHOT
[INFO] Parameter: package, Value: com.sdl.dxa
[INFO] Parameter: packageInPathFormat, Value: com/sdl/dxa
[INFO] Parameter: package, Value: com.sdl.dxa
[INFO] Parameter: version, Value: 1.0-SNAPSHOT
[INFO] Parameter: groupId, Value: com.sdl.dxa
[INFO] Parameter: artifactId, Value: dxawebapp
[INFO] Project created from Archetype in dir: c:\dev\testmaven\dxawebapp
[INFO] ————————————————————————
[INFO] BUILD SUCCESS
[INFO] ————————————————————————
[INFO] Total time: 12.699 s
[INFO] Finished at: 2017-03-22T17:19:49+00:00
[INFO] Final Memory: 16M/376M
[INFO] ————————————————————————
very nice stuff as always Nuno!
Note that the idea of instantiating a Maven archetype instead of just copying a “jumpstart project” (like we do in DXA.NET) is to create a new project, with your own distinct group ID, artifact ID and package name instead of using SDL-defined ones. So, even though things will work if you use `com.sdl.dxa` as group ID and package name, it is not recommended to do so; invent your own IDs/names.
Thanks for posting this, Nuno. It definitely came in handy!
I was following a combination of the SDL Web 8.5 single machine installation instructions and the DXA 1.7 installation documentation. At the end of the DXA 1.7 installation steps, you get a web application built in the web\installer\build folder, but there are no further instructions. At that point, your above steps take effect and complete the full process of running the application in Eclipse.
Here are just a few comments about how my process was different:
– I used the Java DXA code downloaded from the DXA 1.7 documentation (instead of the archetype you mention)
– I had to update the port number to 93 in my Tomcat server.xml file, since I was following other instructions that set the mapping up at port 93. You alluded to this.
– I had to update the timeout limit for the Tomcat Server to something greater than 45 seconds
– Lombok apparently wasn’t needed (I see a lombok jar in my Maven dependencies, but I didn’t have to run any commands)
– Some log statements were not compiling out of the box. I still need to figure out why (for now I just commented them out).
I see know that Lombok is needed for logging. Makes sense. I’ve also realized it’s probably a better practice to work from the archetype, as per your steps. In other words, all of the steps in this post are the correct way to do it
Excellent step-by-step article Nuno. Do you know if the same steps will work with a 2013SP1 setup or is it specific to Web8.5? If not, what would be the differences for getting this working against a 2013SP1 setup (I assume it would be related to CIS)?